Whip Up Thin Mint Cupcakes in 40 Minutes: Your Ultimate Chocolate & Mint Treat
As the aroma of freshly baked goods fills the air and a certain season beckons with its irresistible cookies, we all know what time it is. Yes, it's Girl Scout Cookie season, and if you're anything like us, you've probably stashed away a few (or more!) boxes of those iconic Thin Mints. Their crisp chocolatey shell, infused with cool peppermint, is a symphony of flavor. But what if you could transform that beloved cookie into an even more decadent experience? Imagine a rich, moist chocolate cupcake, studded with crushed Thin Mints, and crowned with a luxurious, velvety mint buttercream. And what if we told you could have this divine creation ready in just 40 minutes? Welcome to the magic of homemade thin mint cupcakes!
This recipe isn't just about combining ingredients; it's about crafting a harmonious balance of deep chocolate and refreshing peppermint, elevated by the signature crunch of the Thin Mint cookie itself. Perfect for parties, a cozy night in, or simply satisfying that sudden craving, these cupcakes are surprisingly simple to make, proving that gourmet taste doesn't always require hours in the kitchen.
The Ultimate Thin Mint Cupcakes: A 40-Minute Wonder
Our journey to the perfect thin mint cupcakes begins with a foundational chocolate cake that’s both intensely flavored and incredibly moist. We’re taking inspiration from classic recipes and infusing them with secret weapons to achieve that authentic Girl Scout cookie essence. The key is in the choice of cocoa and extract, ensuring every bite transports you to a world of dark chocolate and cool peppermint.
The beauty of this recipe lies in its efficiency. While your chocolate cupcakes are baking, you can whisk up a dreamy mint buttercream, ensuring that by the time they've cooled just enough, they're ready for their frosty crown. This parallel process is what makes the 40-minute promise a delicious reality, allowing you to indulge in a truly exceptional dessert without the wait.
Ingredients: Crafting the Perfect Chocolate Mint Harmony
Gathering your ingredients is the first step to success. For that unmistakable Thin Mint flavor profile, we'll be focusing on specific types of cocoa and extracts that truly make a difference. Remember, quality ingredients always yield the best results!
For the Rich Chocolate Cupcakes:
- 1/2 cup (1 stick) unsalted butter: Room temperature is ideal for creaming, but for the melted mixture, it's all about melting down.
- 1/2 cup unsweetened cocoa powder: For a deeper, darker chocolate that mimics the cookie, consider using Dutch-processed cocoa or even black cocoa powder. The latter will give you that true, deep Thin Mint hue and flavor.
- 1 teaspoon kosher salt: Enhances all the flavors.
- 1/2 cup water: Helps create a rich, moist batter.
- 1 cup all-purpose flour: The structural backbone of our cupcakes.
- 3/4 cups granulated sugar: Provides sweetness and moisture.
- 3/4 teaspoons baking soda: Our leavening agent, which works with the acidic components to create a light, airy crumb.
- 1 large egg: Binds everything together and adds richness.
- 1/2 cup low-fat plain or vanilla yogurt: A secret ingredient for incredible moisture and a tender crumb. Don't skip this!
- 1 teaspoon pure vanilla extract: A flavor enhancer that complements chocolate beautifully.
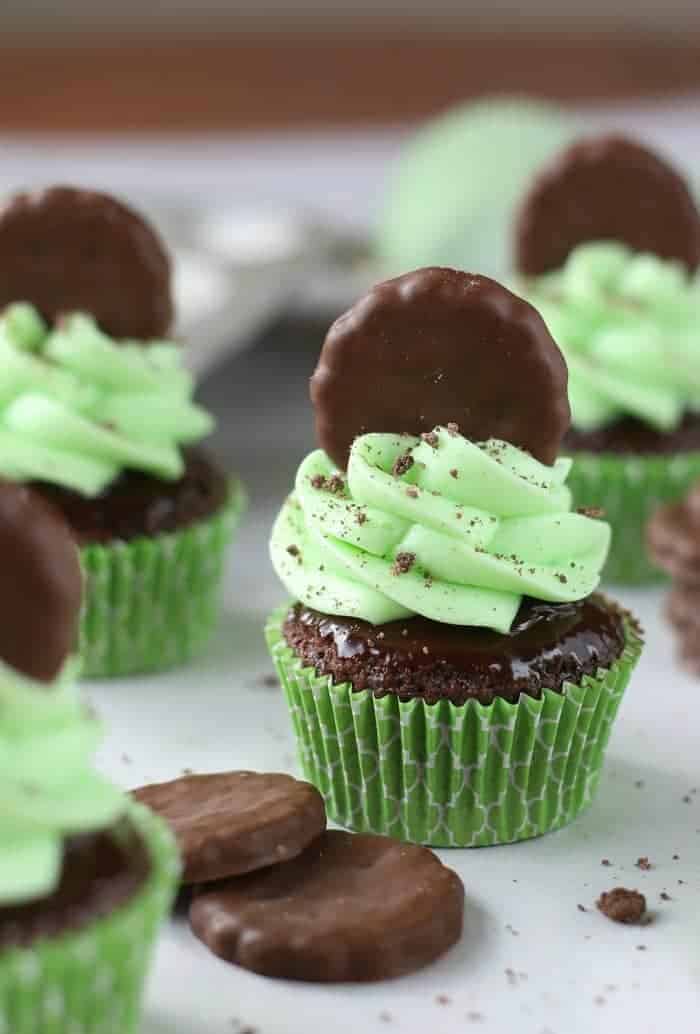
- 1 sleeve Girl Scout Thin Mint Cookies (approx. 16 cookies), crushed slightly: These are the stars! Crushing them adds texture and a burst of authentic flavor directly into the cake.
For the Velvety Mint Buttercream Frosting:
- 1/2 cup (1 stick) unsalted butter, softened to room temperature: Crucial for a smooth, lump-free frosting.
- 3 cups powdered sugar: The base for our sweet frosting. Sifting can prevent lumps.
- 1-1.5 teaspoons peppermint extract: This is critical! Use peppermint extract, not general "mint" extract. Mint extract often has a spearmint flavor that can taste like toothpaste, while peppermint delivers that authentic Thin Mint zing.
- 2 tablespoons milk, or more if needed: Adjusts the consistency of your frosting.
- Pinch of salt: Balances the sweetness.
Pro Tip: Peppermint vs. Mint Extract! The subtle difference in extract can drastically alter the final taste profile of your thin mint cupcakes. As highlighted in the cookie box itself, the flavor is peppermint. Peppermint extract provides a crisp, cool, and distinctly Thin Mint taste, whereas generic "mint" extract often leans towards a spearmint profile, which isn't what we're aiming for here. Invest in a good quality peppermint extract for the most authentic flavor. You can find more insights on achieving the perfect peppermint flavor in Girl Scout Thin Mint Cupcakes: Peppermint Flavor Secrets Revealed.
Step-by-Step Guide: Your 40-Minute Thin Mint Journey
Efficiency is key to our 40-minute promise. While some steps require attention, others can be done in parallel, making the process smooth and enjoyable.
Cupcake Creation:
- Preheat & Prep (2 minutes): Preheat your oven to 350°F (175°C). Line a 12-cavity cupcake pan with paper liners. Set aside.
- Dry Ingredients (2 minutes): In a large bowl, whisk together the flour, granulated sugar, and baking soda. Set aside.
- Melted Mixture (5 minutes): In a small saucepan over medium-low heat, melt the 1/2 cup butter, cocoa powder, salt, and water together. Stir constantly until completely melted and smooth. Remove from heat immediately to prevent scorching the cocoa.
- Combine & Whisk (3 minutes): Add about half of the warm butter/cocoa mixture to your dry ingredients and stir gently. Then add the remaining mixture and stir until fully combined. Whisk in the large egg until thoroughly incorporated.
- Enrich & Flavor (2 minutes): Stir in the yogurt and pure vanilla extract until smooth.
- Thin Mint Magic (1 minute): Gently fold in the slightly crushed Thin Mint cookies. Be careful not to overmix; just enough to distribute the cookie pieces.
- Portion & Bake (20 minutes total - 2 mins portioning, 18 mins baking): Portion the batter evenly into the prepared cupcake liners, filling each about 3/4-full. Bake in the preheated oven for 17-18 minutes, or until a toothpick inserted into the center of a cupcake comes out clean.
- Cool (Parallel task - 15 minutes minimum): Transfer the baked cupcakes to a wire rack to cool completely. This is crucial before frosting to prevent melting.
Frosting Perfection (Parallel task - 10 minutes):
While your cupcakes are cooling, dive into the buttercream!
- Whip Butter (3 minutes): In the bowl of a stand mixer fitted with a paddle attachment (or using a hand mixer), whip the softened 1/2 cup butter until light and fluffy. This aerates the butter, giving a smoother frosting.
- Gradually Add Sugar (4 minutes): Slowly add the powdered sugar, a cup at a time, mixing on low speed until combined, then increasing to medium-high until smooth and fluffy. If your frosting seems too stiff, it's okay, we'll fix it.
- Flavor & Adjust (2 minutes): Add the peppermint extract and a pinch of salt. Mix until just combined. Now, slowly stream in the milk, 1 tablespoon at a time, until your desired consistency is reached. For a thicker, pipe-able frosting, you might use less milk or even add a bit more powdered sugar. For a softer, spreadable frosting, you might need a touch more milk.
- Final Whip (1 minute): Whip on high for an additional 30 seconds to a minute to make the frosting extra airy and smooth.
Once your cupcakes are completely cool, frost them however you like – piped elegantly, or simply spread with a spatula. For an extra touch, garnish with a sprinkle of crushed Thin Mints!
Tips for Thin Mint Cupcake Mastery & Flavor Secrets
Beyond the steps, a few key insights will elevate your thin mint cupcakes from good to unforgettable:
- The Power of Black Cocoa: While standard cocoa powder works, experimenting with black cocoa powder (like Oreo cookies use) will deepen the chocolate color and provide a less bitter, more intensely rich flavor, mirroring the cookie’s profile.
- Yogurt's Role: The low-fat yogurt isn't just for moisture; its acidity reacts with the baking soda, contributing to the cupcakes' tender crumb and beautiful rise without leaving a sour taste.
- Don't Overmix: Overmixing flour develops gluten, leading to tough cupcakes. Mix only until ingredients are just combined, especially after adding the flour and crushed cookies.
- Cookie Crumbles Everywhere: Don't limit the crushed Thin Mints to just the batter! Save some to sprinkle on top of the frosted cupcakes for an extra textural contrast and visual appeal.
- Frosting Consistency Control: If your buttercream seems too thick, add milk 1 teaspoon at a time. If it’s too thin, add more powdered sugar, 1 tablespoon at a time, until you reach your desired consistency. A beautifully smooth and rich fudge frosting, as described in some adaptations, is achievable with careful temperature control and gradual additions. For more on creating truly indulgent chocolate mint treats, check out our guide on Indulge in Rich Thin Mint Cupcakes: The Ultimate Chocolate Mint Treat.
- Cooling is Non-Negotiable: Rushing the cooling process will result in melted, messy frosting. Patience here pays off in a perfectly presented cupcake.
- Storage: Store any leftover cupcakes in an airtight container at room temperature for up to 2-3 days, or refrigerate for up to 4 days. Bring them to room temperature before serving for the best flavor and texture.
There you have it – a comprehensive guide to whipping up delightful thin mint cupcakes in under an hour! This recipe is a testament to how simple ingredients, combined with a few clever techniques and the magic of Girl Scout Thin Mints, can create an extraordinary dessert. Whether you're a seasoned baker or a kitchen novice, these chocolate and mint frosted delights are sure to impress and satisfy. So, grab those extra boxes of Thin Mints and get baking; your taste buds will thank you!
